Untruth #1: Only a magician can true wheels!
What a load of rubbish! Could do with a bit of time: Yes, could have something to do with WANTING to true them (yourself): Yes.
Untruth #2 PATIENCE of Job* required,
No, I don’t need it and nor do you. Patience, my friend, is something you only need, when you have run out of it! So, if you are enjoying or ‘getting into’ something, patience doesn’t even enter the equation. Ever! *And I meant the biblical person, you silly, not the ‘job’ in hand…
Having settled THAT myth, let’s get on with talking about trueing. WITHOUT pictures. Pictures don’t help at all, in fact, which is why I left them out!
Actually quite simple, but can be frustrating if gone about in the wrong way. The thing to remember is that a wheel is ROUND. (You knew that? Well, that’s a good start!) What I mean is, this: If you tighten (or loosen) a spoke in one place, you are not going to solve anything just by that action alone. All the spokes surrounding it will have their tension altered, as will all the spokes diametrically opposite!
All you really have to keep in mind is that if you tighten one here, the spokes left and right will LOSE a bit of tension (the ones closest will lose most, of course, and as they become further away to the right and left a little less, obviously). On the opposite side, the tension will INCREASE and the originally ROUND (and now we come to what I meant with the first rather obvious statement) rim, will be SQUASHED (ever such a tiny bit, I hope) into an oval shape, and a bit twisted, too, as the spokes are not along the centreline, nor are the lines of pull to the hub!
Ouch, that could get complicated! And it will, if you don’t remember that extremely simple fact!
OK, so let’s take up where we left off in the last blog: The spokes are all in their proper holes and the hub is sort-of in the middle. Now it is useful to know the actual offset of the rim, that being the difference between the plane existing at the face of the dge of the rim (imagine stretching some ‘Kling-Film’ over the rim and the drum-skin stretched over it would be the first ‘face’) and the same would be true of the one side or the other of the drum. The offset gives the distance between these two faces to position the centre of the tyre when fitted, along the centreline of the bike. For centreline tyre, read centreline wheel-rim, of course.
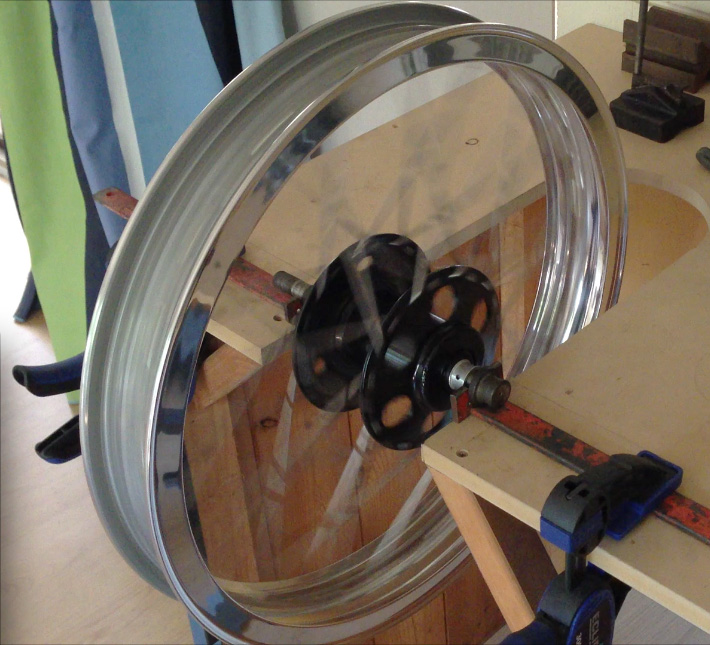
Not exactly rocket-science so far. Given that you know the offset as specified by the manufacturer or measured off a bike that you know is right (or off the original wheel/hub before it was dismantled, and assuming that the width of the rims is the same – otherwise some simple mathematics is required). If you are lucky, you have a complete wheel, like I have in the pictures, to go by!
You could now, for example, lay the hub and wheel on its side, with one ‘face’ down on a flat surface (the bench??). The wheel-rim is on the same surface (the spokes are still loose and so the rim naturally drops onto the surface with gravity), so ‘0’ offset… but some blocks under the rim (at least three, evenly spaced) of the right measurement, and the wheel be ‘set up’ in the right position, more-or-less, already. All you have to do is get the wheel sort of in the middle and then you can just nip up the spokes all the way round on the topside first (which will hold the rim off the table-top at the right distance – near enough) and then the ‘underside’, so the spokes on the ‘bottom’ row. , so it won’t ‘flop’ when you pick it up.
OK. Keep your nerve. If it’s not perfect, and, of course it will not be anything like perfect, don’t despair. SOME of it will be almost right.
An interesting experiment is, while the spokes are all loose, to tighten just one spoke and see what an amazing difference it makes, and in which direction etc. Take notes if you will, but OBSERVE! This will stand you in good stead in the future.
Now the actual trueing starts. Place your spindle in the jig (or Hub, or however you have set it up) and rotate the wheel SLOWLY. Set up your pointer to show where the one edge of the rim should be (the hub should at least go round straight!!). You will see that some parts of the rom are ‘close’, some are far away. This goes for left-right-wobble and concentricity. I like to start with left-right.
The process is EASY and LOGICAL.
Start with the bits further away from the truth, so to speak. For the sake of argument, we have a wobble that is too far left on a portion of the rim: Forcing will achieve nothing, so I don’t try to tighten up the right-hand-side yet. No! LOOSEN the 4 or 5 of the spoke row on the LEFT of the rim first, so that the rim doesn’t go out of round, pull the rim over in the right direction with a hand and THEN, just nip up the 4 or 5 spokes on the right side of the centre that will keep it in place. If it doesn’t come enough over when pulling by hand, loosen the spokes on the left some more, until it does!,
Go Round the rim until more-or less right (within 1/4 an inch or so), the fine tuning starts in the same way, loosening first (really don’t want to distort the rim, which presumably is still round!) and then tightening. The difference here is now that the spokes left and right will be better ‘felt’ when the tension eases, it’s now more a question of working by feel, the centre spoke of the direction being loosened/tightened a bit more than the ones left and right by feel…You will get the hang of it and you just have to let the tension just go on the one side and just pull it up on the other, though it’s not that critical yet, as a start could be made with getting the wheel to go round nicely now
A word about FEEL: Not everyone is endowed with a finely-tuned sense of feel, so I have trick for this… there are those screwdriver-tips that are meant for drill-drivers with octagonal shafts (usually about 6mm across-the-flats). Get a nice wide-bladed one of these slightly longer than the one-inch version (two or three inches long is fine) and make the octagonal end to a handle by winding some masking-tape around it – more for fat fingers, less for thin – and use thsis for ‘twiddling’ the ends of the spokes to loosen and tighten: THAT WAY, you can’t overtighten, and you will feel if you have a spoke that is too tight, and will know what to do with it (loosen the spoke diametrically opposite to it, actually!)
The process is the same, turning the wheel or ‘swinging’ it, while holding it in one hand between finger and thumb, in half-turns to see where it is ‘high’ or ‘low’ compared to your pointer (Which could be screwdriver lying on the table, pointed at the edge of the rim!). This time, hold the wheel where it is high, rotate half way round and LOOSEN the spokes on the low-side, taking it back round and tightening the spokes on the high spot to bring that part of the rim closer to the centre. That’s the principle.
Sounds complicated and requiring far too much time and concentration… It’s certainly not impossible and is actually quite meditative in it’s way. Time will just fly, and you will have to stretch often to negate the tensed up shoulders, arms and the effects of that tangential, one-eyed ‘blick’ that becomes a habit, once started.
When you are nearly there, go and have a cuppa (or whatever).
This is important! Now and later, when it is actually finished and the spokes are all tensioned so that they ring (rather than give dull ‘thud’ when tapped), the rim has to ‘settle’, and going away for a few hours or a day is super important!
OK, you’ve had your break, now you can get the real fine stuff done, tuning out the wobble and the concentricity errors, if you hadn’t done so already. Now all the spokes vac be tightened a bit over hand-tight and ‘ping’ tested. Once done, give it a whirl again and be mighty pleased with yourself, take two gold stars and a glass of cleansing Ale for your efforts!
AND, don’t touch it again until tomorrow, AT LEAST… if it needs tweaking, do it TOMORROW, not now, OK!?
Now you have an idea how to do it, I’ll show what usually happens: The WELD is nearly always a bit off, you can’t do anything about that. Live with it. The wheel will still run true, as the TYRE is FLEXIBLE (well, it’s supposed to be, anyway…) Don’t fret. Within one millimetre is OK, less is better (but not always achievable first up), and don’t forget the weld: It will generally, especially with alloys, throw your best efforts out of true…
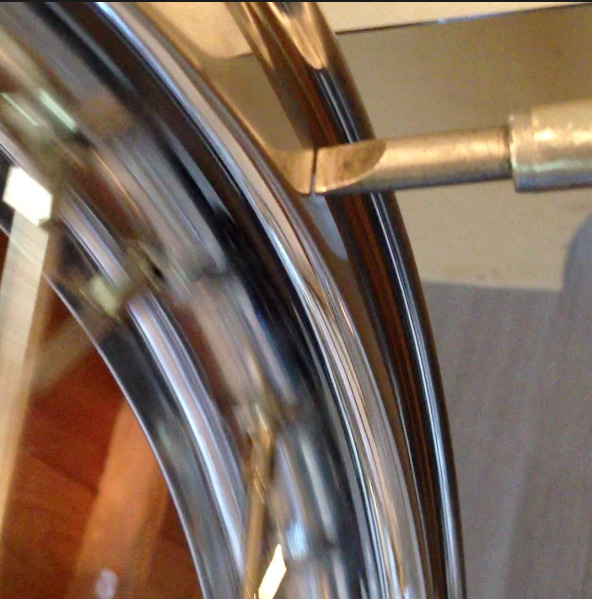
Screwdriver-reflection trueing of the side, no micrometer actually needed! The reflection doubles your distance, so the error is magnified, making it easier to locate and finer to fix! Since th screwdriver is just laying there, it can’t damage or scratch the rim, either!

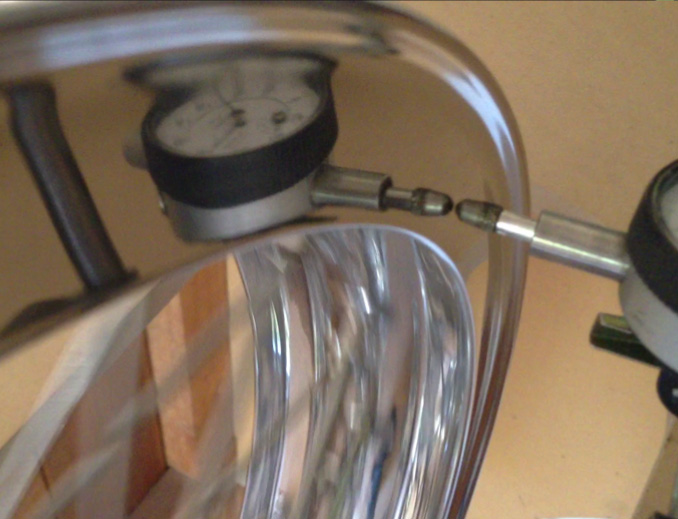
If you want to be able to quote actual numbers and are paranoid and have the gear, you could set up with various different types of direct-measuring equipment, for example as above. What you use is not critical. The screwdriver method can also give just as real numbers if the screwdriver is fixed and you have a set of feeler-gauges handy…
Above all, have some fun! Click on the picture below, (you might have to wait while it loads 21MB!) to see the wheel turning! Notice that the wheel spins nicely, except where the weld is. This doesn’t make any difference on the road…
©peter gouws 2012